Assigning service-specific static IPs for outbound traffic in AWS VPCs
Posted on Sun 17 February 2019 in Articles
The problem
At Ionic we commonly use network ACLs to restrict access to some services to a list of known IPs. In this specific case, I needed ephemeral servers spun up with Databricks Spark to be able to reach an internal monitoring server.
The problem is that by default in AWS VPCs you have instances that spin up and are assigned their own public IPv4 address. Those instances start inside subnets that have route tables set up with 2 entries:
- route all traffic in the VPC IP range (e.g.
172.31.0.0/16) to the targetlocal - route all other traffic (
0.0.0.0/0) to an internet gateway (IGW)
The IGW acts as a 1-to-1 NAT for the instances in the those subnets, so each of those instances has its own public IP. Because these public IPs change every time we launch a new server, this makes it hard to work with network ACLs.
NOTE: I realize that you can reserve a pool of Elastic IPs (EIPs) for yourself and attach those to instances as they boot. This would also allow me to have traffic from a fixed set of IPs. However since I am booting a high variable number of servers, I would need a large block of EIPs to make this work, and I would need to add extra automation to attach EIPs on boot. This sounded like a much messier solution than what I came up with below.
To fix this, I decided to use AWS's VPC NAT service. The NAT must be placed in a public subnet (meaning the route table points to an IGW), and you must update the route tables of other subnets to point to the NAT. I figued I could add a couple specific IPs to the route tables so the IGW is used directly for most traffic but we use the NAT for querying some specific IPs.
To do this, I took the following steps.
1) Create a new subnet
I didn't want to mess with any of the existing subnets, so I created a new subnet named PublicNAT with CIDR 172.31.96.0/20. That was the next block available in the default VPC created by Amazon when you first create an AWS, which uses the address space 172.31.0.0/16.
2) Create a NAT
I had to choose the VPC to associate it with, and there was also an option to create an Elastic IP (EIP) during setup, or you could select one that you already creatded. I chose to create a new EIP.
3) Boot an instance inside one of the other VPC subnets
I booted the instance and ssh'd in. I ran the following to confirm the public IP was the same value AWS reported.
ubuntu@ip-172-31-35-2:~$ curl http://checkip.dyndns.org
<html><head><title>Current IP Check</title></head><body>Current IP Address: 18.210.78.190</body></html>
I also ran a command to get the IP addresses used by the checkip service.
ubuntu@ip-172-31-35-2:~$ dig checkip.dyndns.org

; <<>> DiG 9.10.3-P4-Ubuntu <<>> checkip.dyndns.org
;; global options: +cmd
;; Got answer:
;; ->>HEADER<<- opcode: QUERY, status: NOERROR, id: 52264
;; flags: qr rd ra; QUERY: 1, ANSWER: 4, AUTHORITY: 0, ADDITIONAL: 1

;; OPT PSEUDOSECTION:
; EDNS: version: 0, flags:; udp: 4096
;; QUESTION SECTION:
;checkip.dyndns.org.            IN      A

;; ANSWER SECTION:
checkip.dyndns.org.     0       IN      CNAME   checkip.dyndns.com.
checkip.dyndns.com.     60      IN      A       216.146.43.70
checkip.dyndns.com.     60      IN      A       216.146.43.71
checkip.dyndns.com.     60      IN      A       131.186.113.70

;; Query time: 2 msec
;; SERVER: 172.31.0.2#53(172.31.0.2)
;; WHEN: Sun Feb 17 20:02:28 UTC 2019
;; MSG SIZE  rcvd: 127
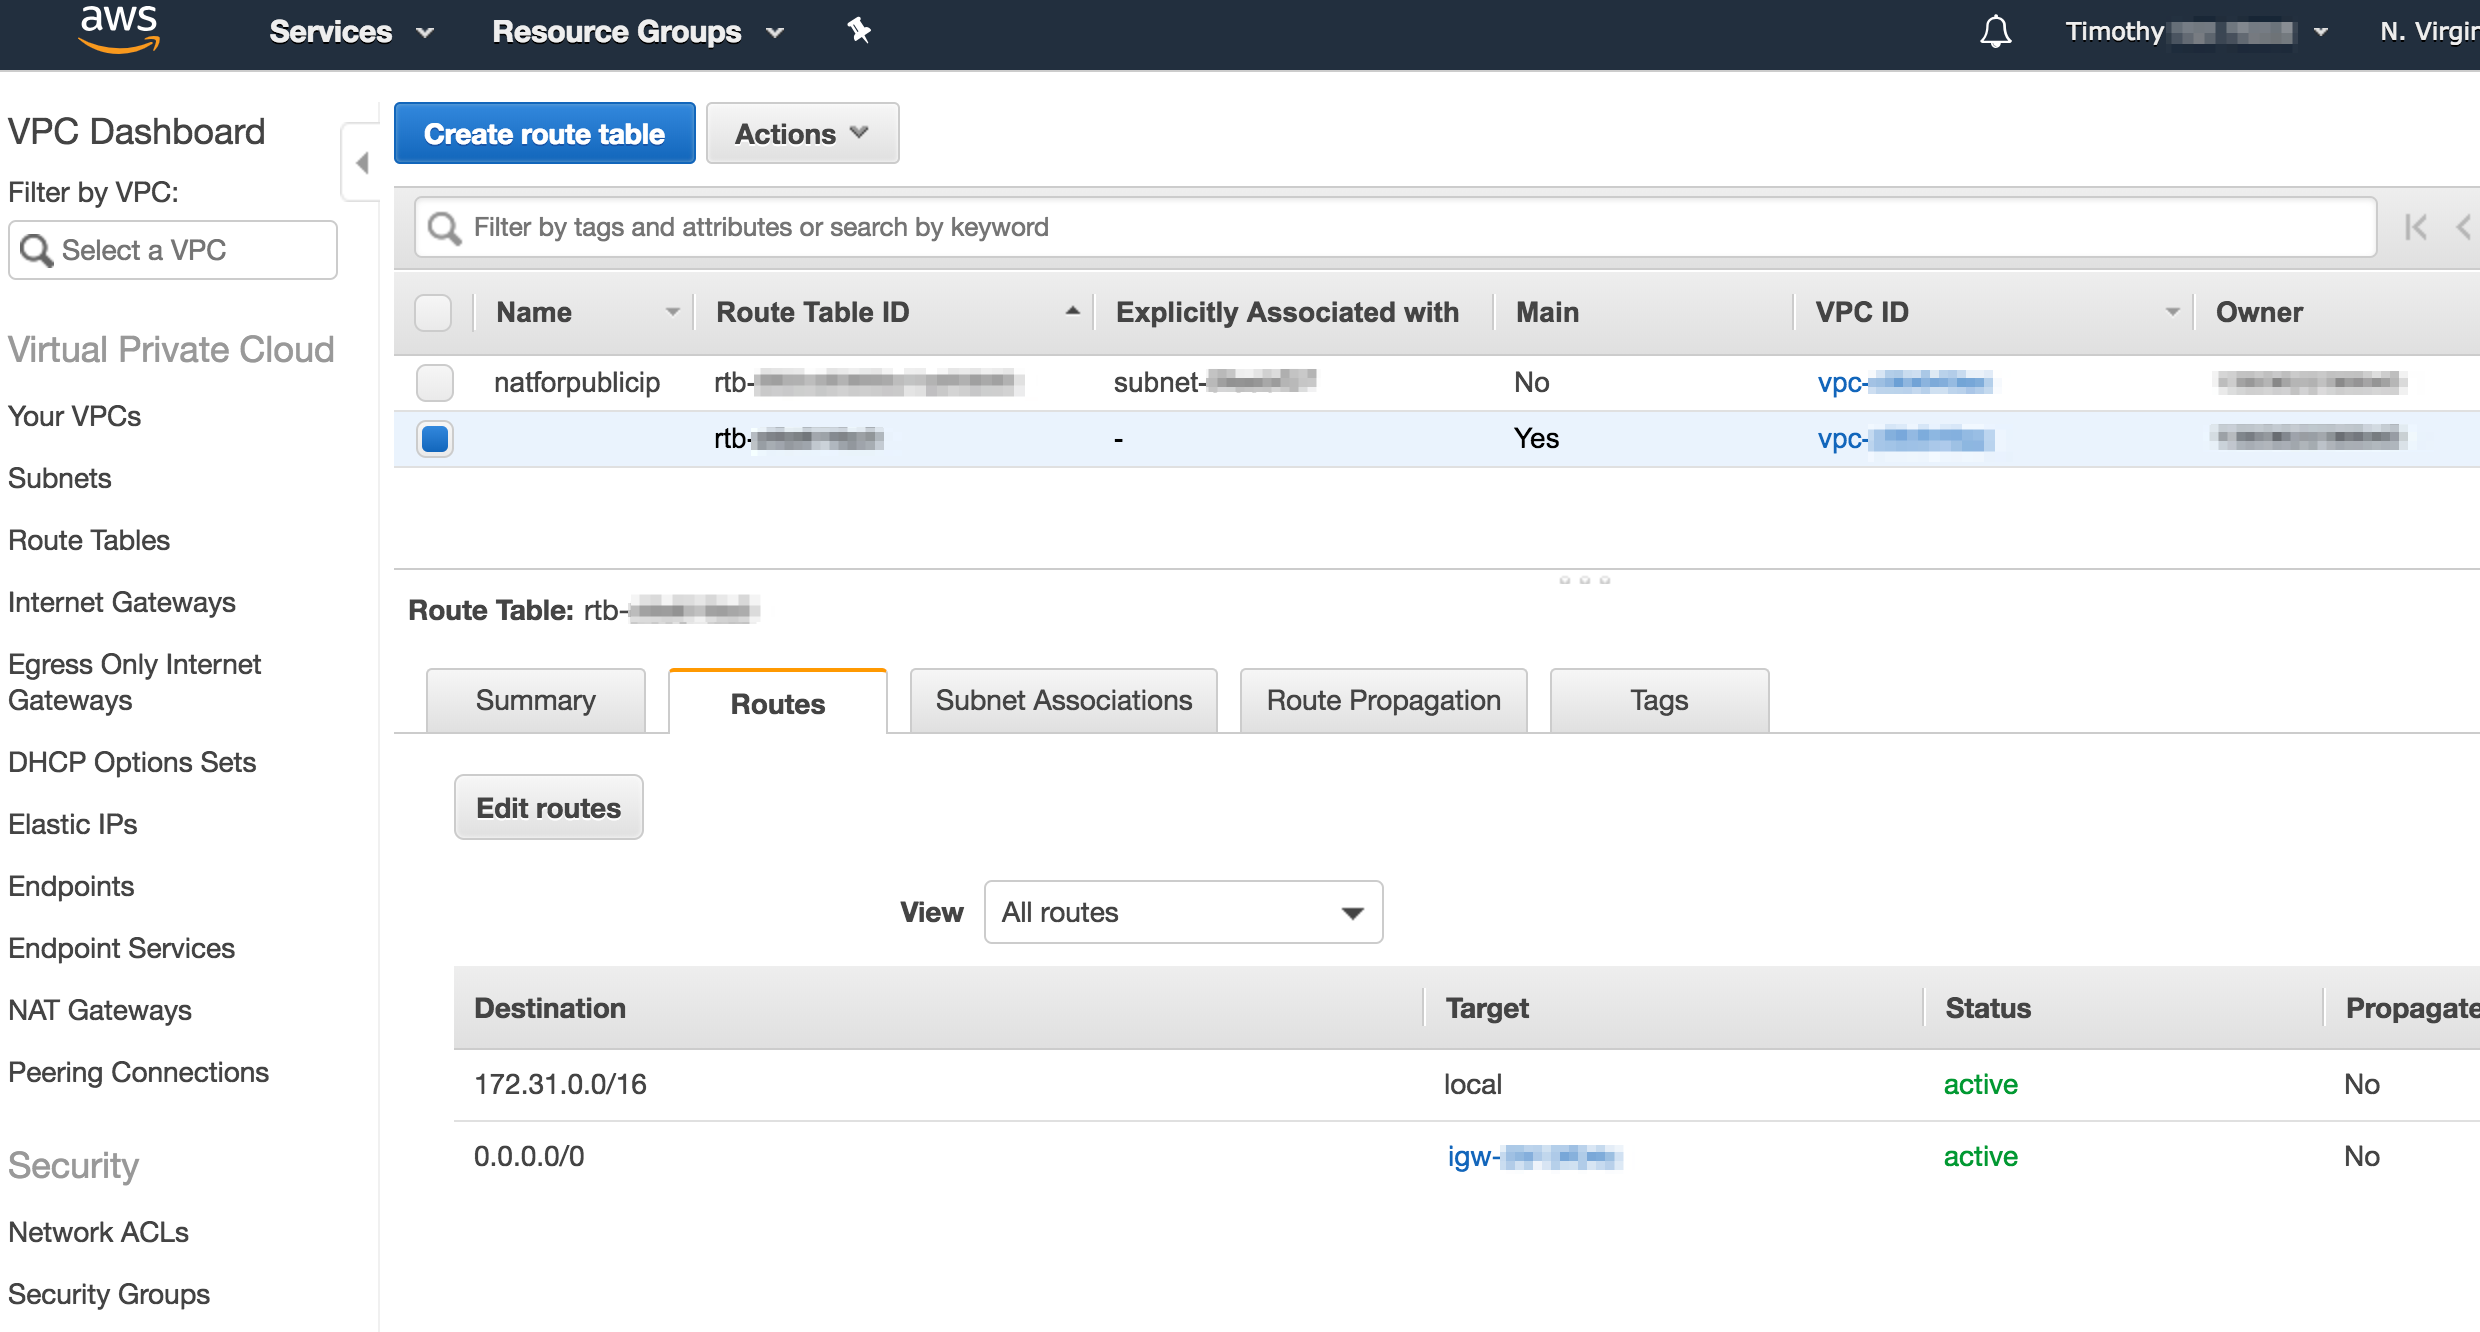
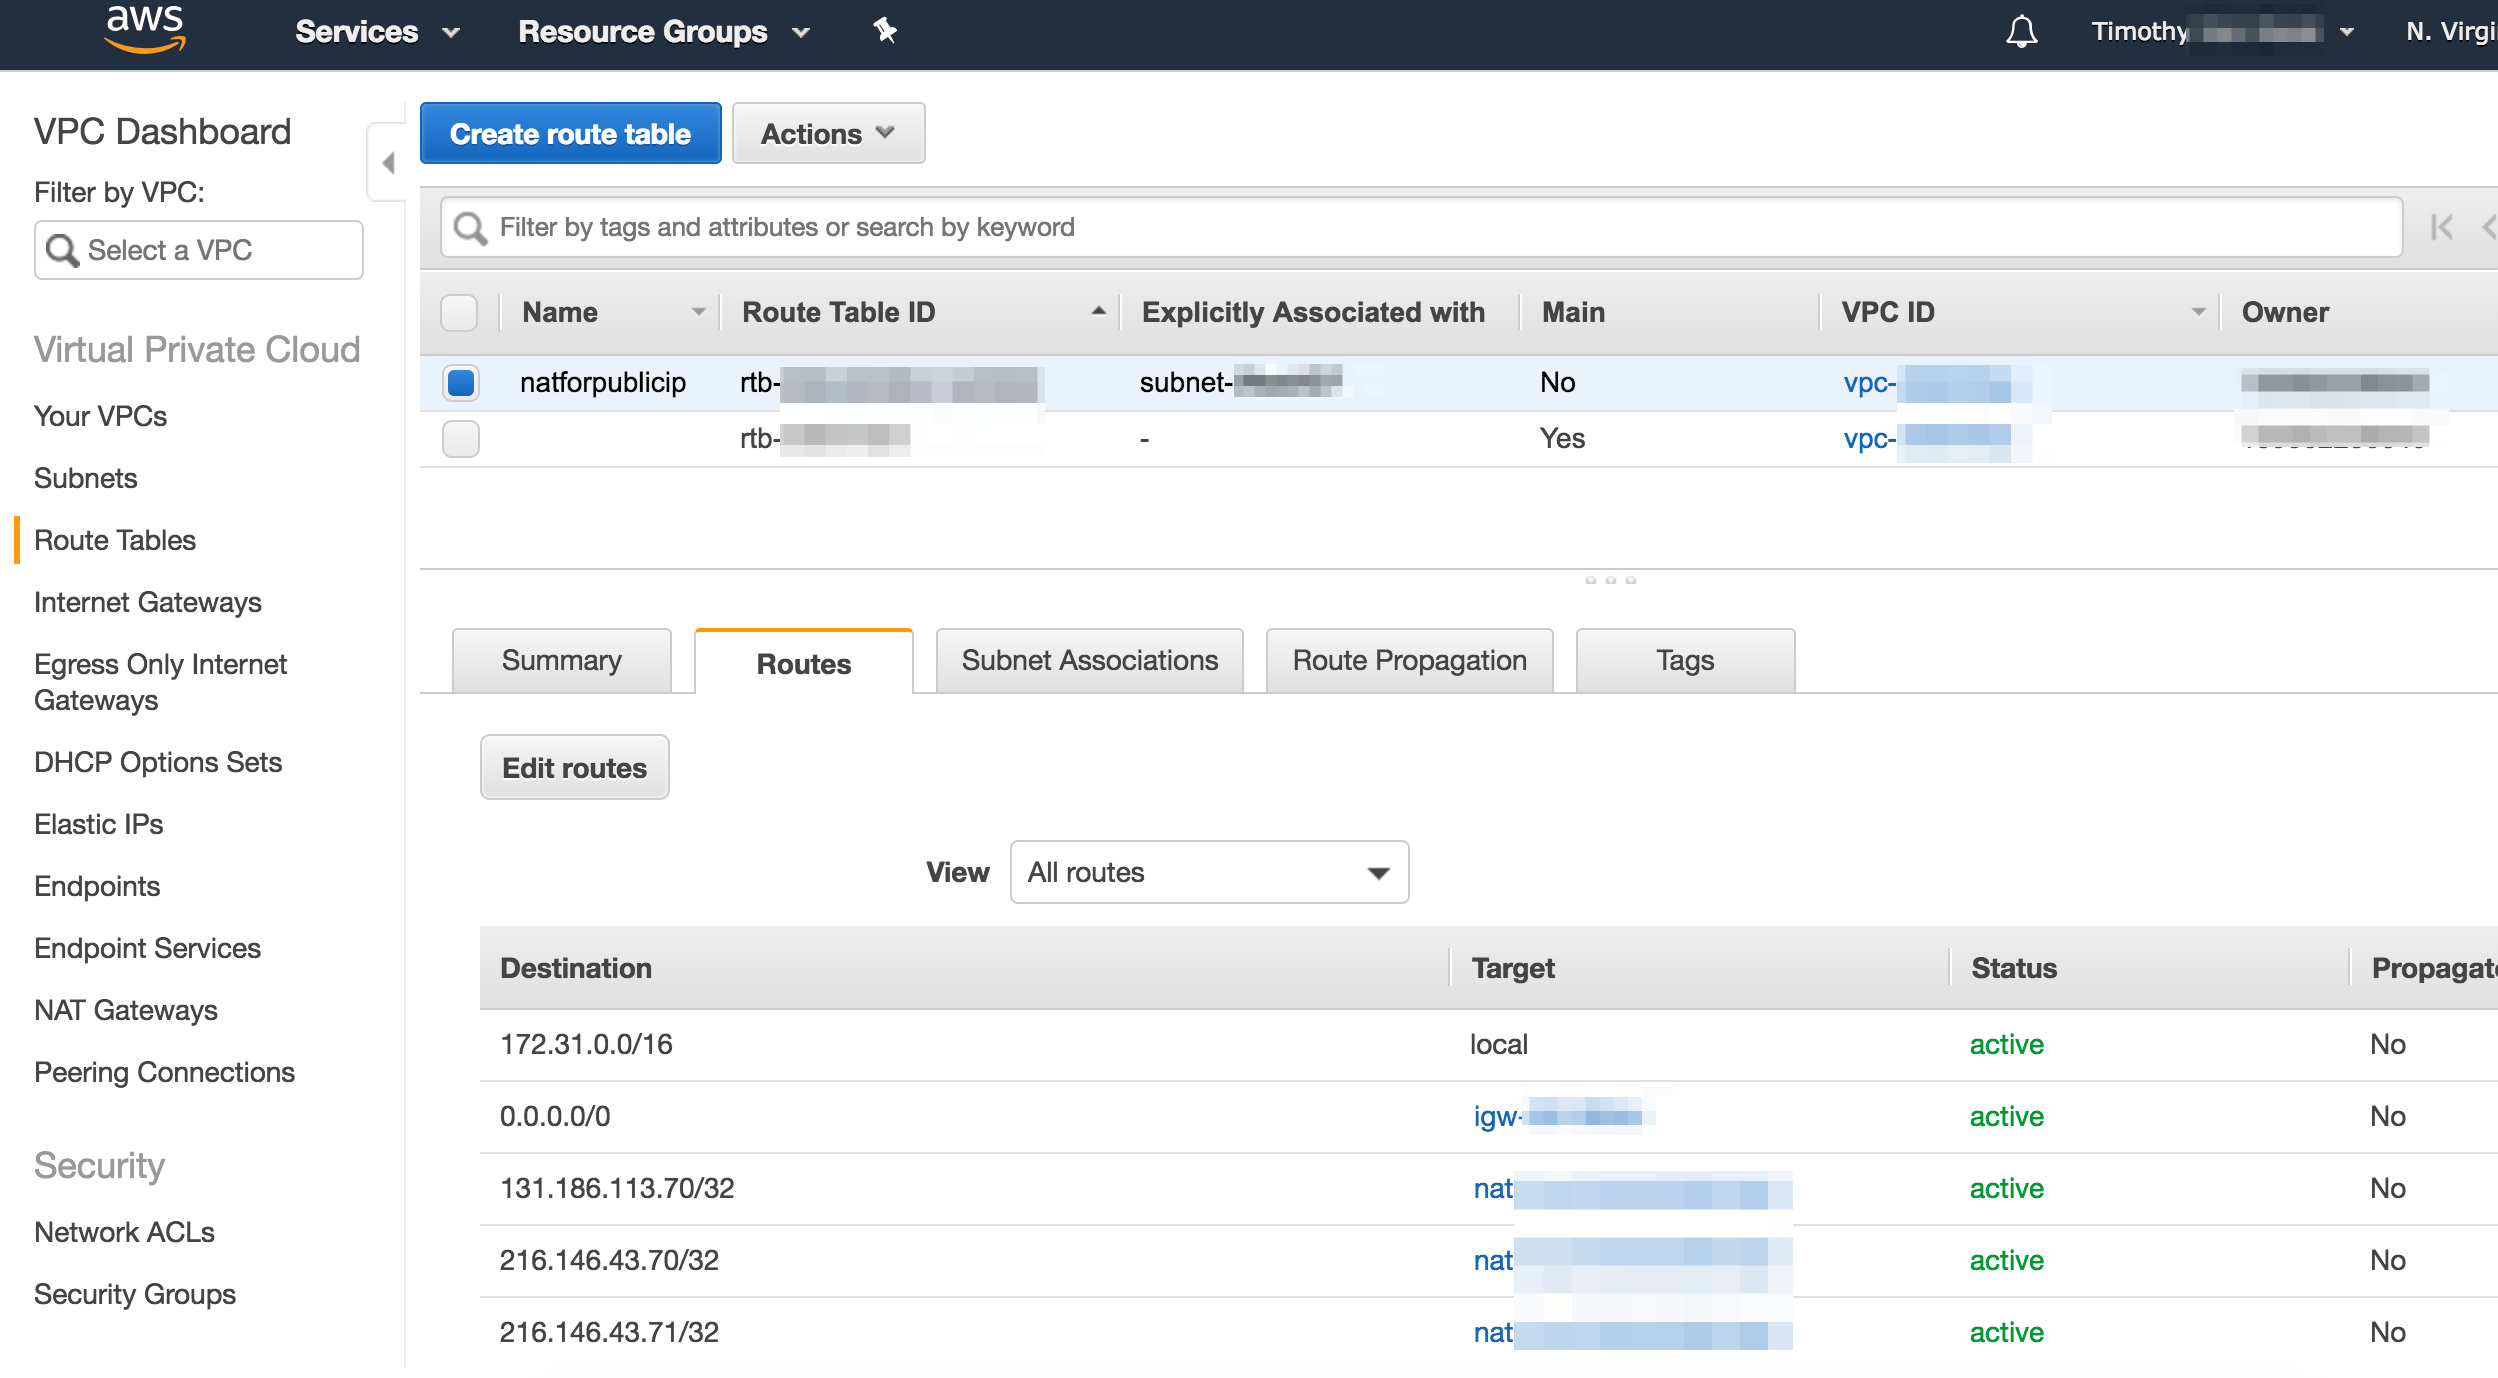
4) Create new route table
All the subnets in the default VPC by default use the same route table with 2 rules in it, which look like this.
I created a new one that point to the NAT we created in step 2 for the IP addresses used by the checkip service. I named it natforpublicip so it would be easy to find. After that it looked like this.
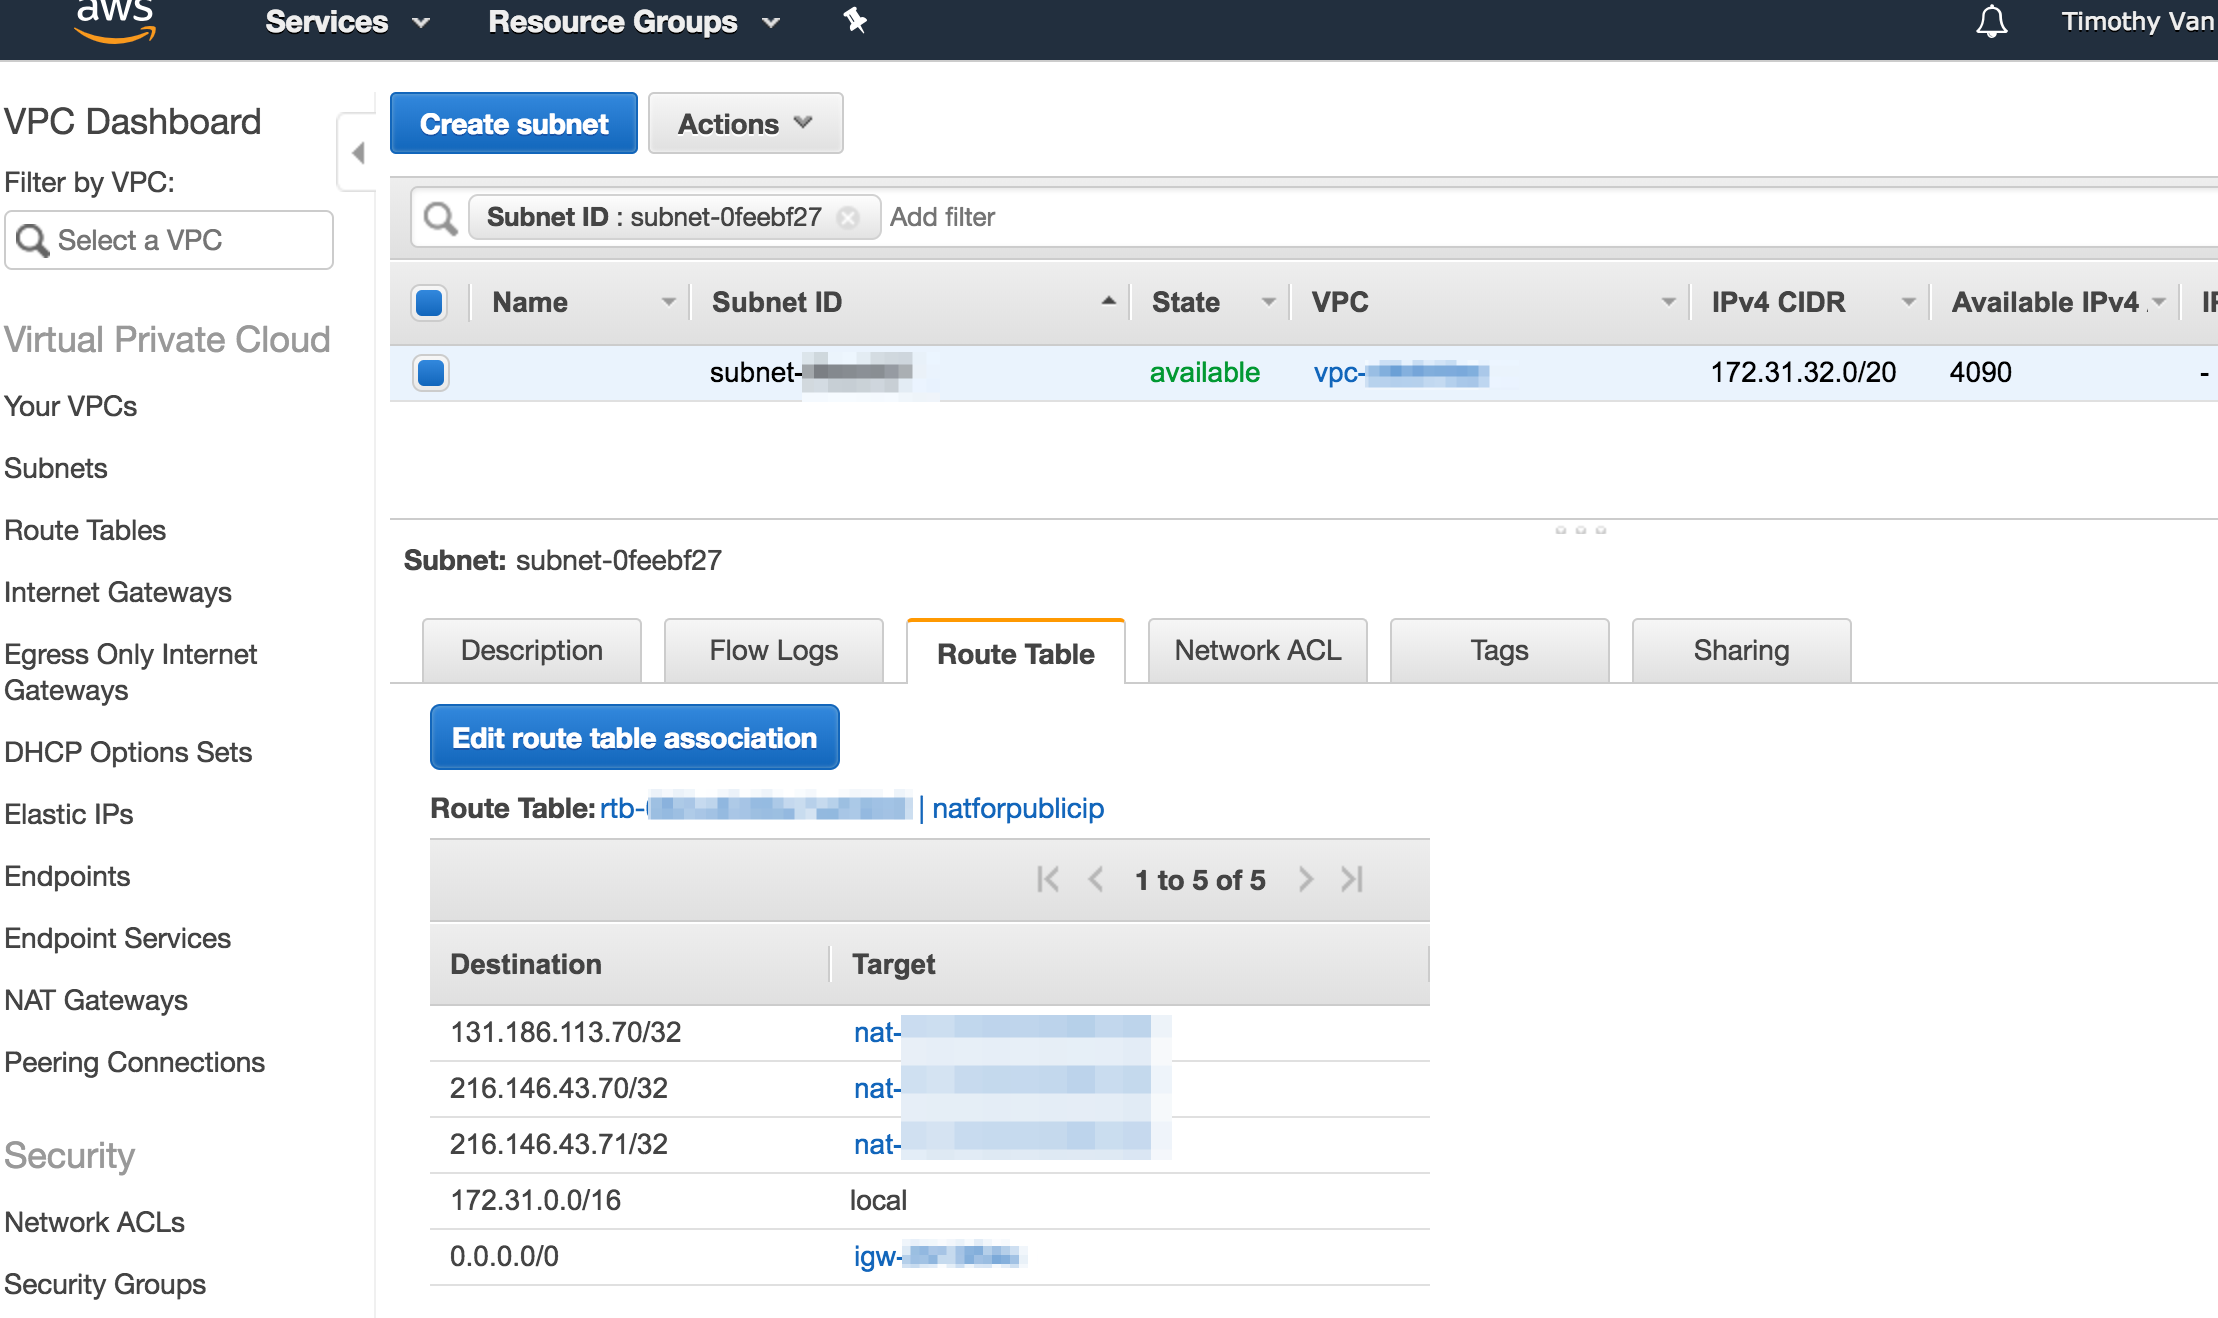
5) Associate new route table with the subnet containing the currently running instance
This is pretty simple. Just click the "Edit route table association" in the "Route table" tab for the subnet. That looks like this.
It worked
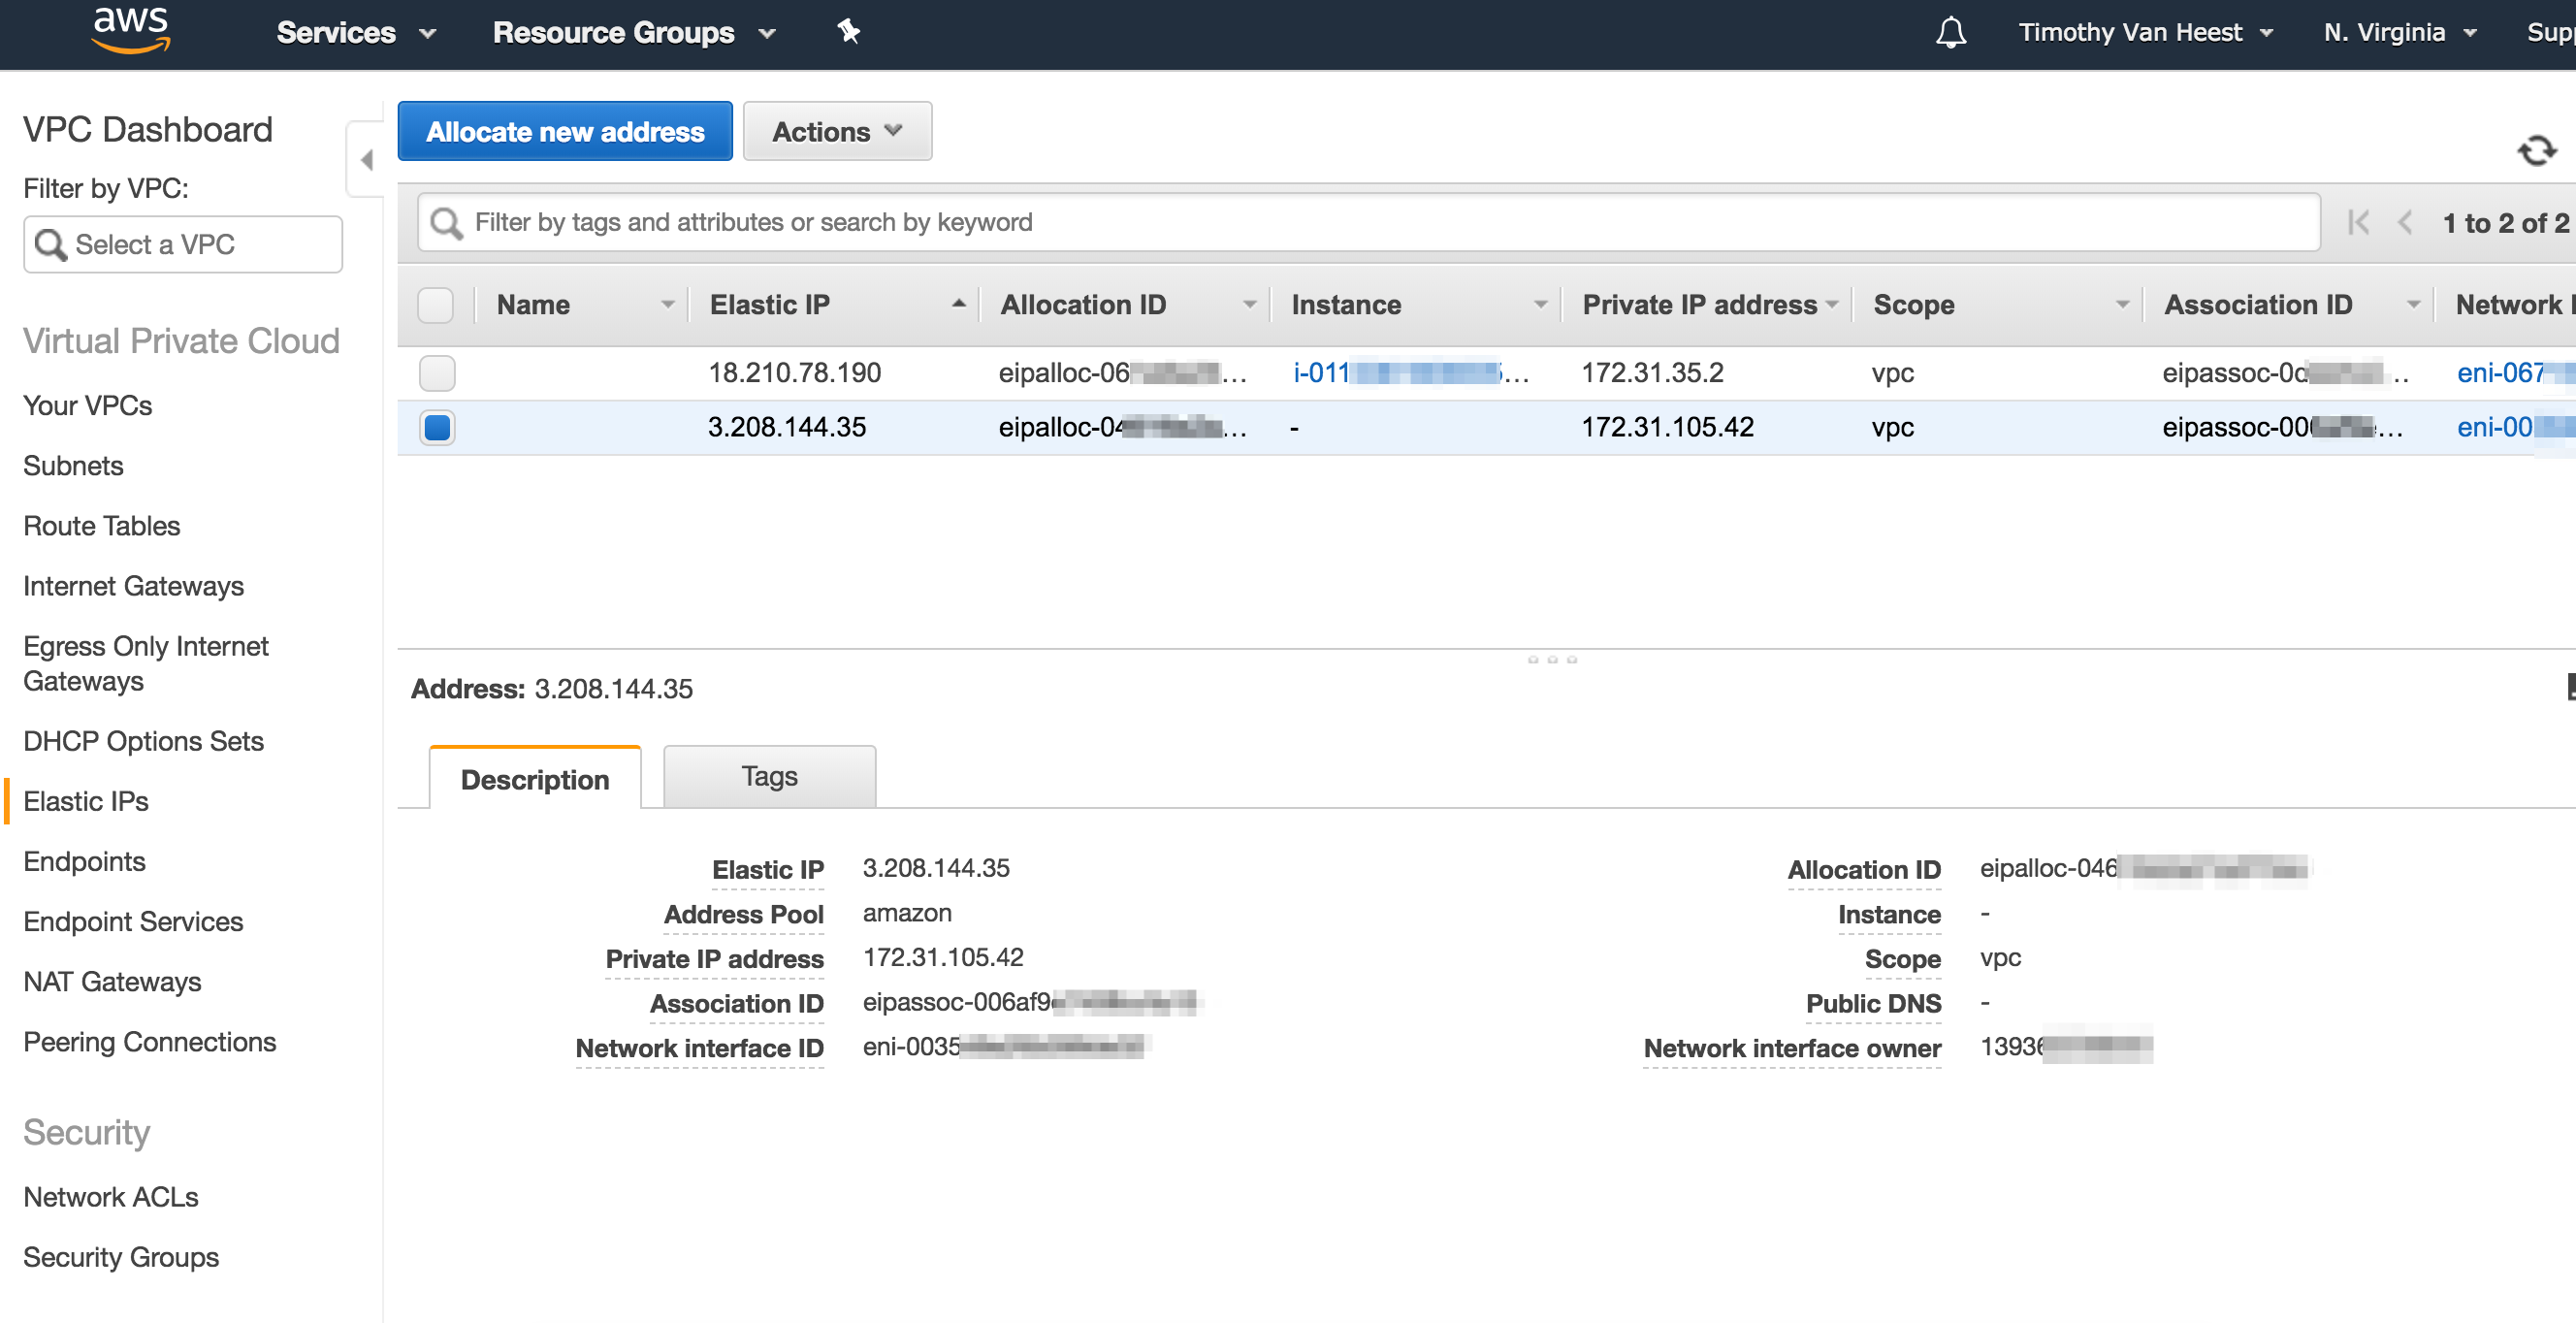
After these steps, I checked what my public IP is from the instance (which was still running), and I got this:
ubuntu@ip-172-31-35-2:~$ curl http://checkip.dyndns.org
<html><head><title>Current IP Check</title></head><body>Current IP Address: 3.208.144.35</body></html>
I checked my list of elastic IPs and confirmed that the IP reported by checkip was the same EIP associated with the NAT I created. Note that the other EIP in the list is the one originally associated with the instance when it was launched.
So now by simply updating our route table to point to the NAT for our internal monitoring services (and making sure we launch instances in subnets that use that new route table), we can make sure that all their outbound traffic to those services comes from a single IP address that we can allow via network ACLs.